Stonehenge Golf Club
View the hole-by-hole scorecard and tee yardages. Fly through Stonehenge Golf Club hole by hole in 3D to explore the mapped holes before you play. Explore the interactive course map. Download a free printable course map PDF and a free printable yardage book PDF. No signup required.
Stonehenge Golf Club course layout, yardage book, scorecard, green maps
Interactive course map
Download PDFExplore 7 of 18 holes at Stonehenge Golf Club. Select a hole to see its details. Free printable PDF · No signup required.

Hole 1Par 5
- Red Women
- 491 yd
- Green Women
- 456 yd
- Plat Men
- 574 yd
- Gold Men
- 533 yd
- Red Men
- 491 yd
- Gold Women
- 533 yd
- Plat Women
- 574 yd
- Green Men
- 456 yd
Yardage book & Green maps
Download PDFExplore 7 mapped hole layouts with tee-to-green distances in the free yardage book. View 7 green maps showing putting surface outlines and dimensions where available. No signup required.
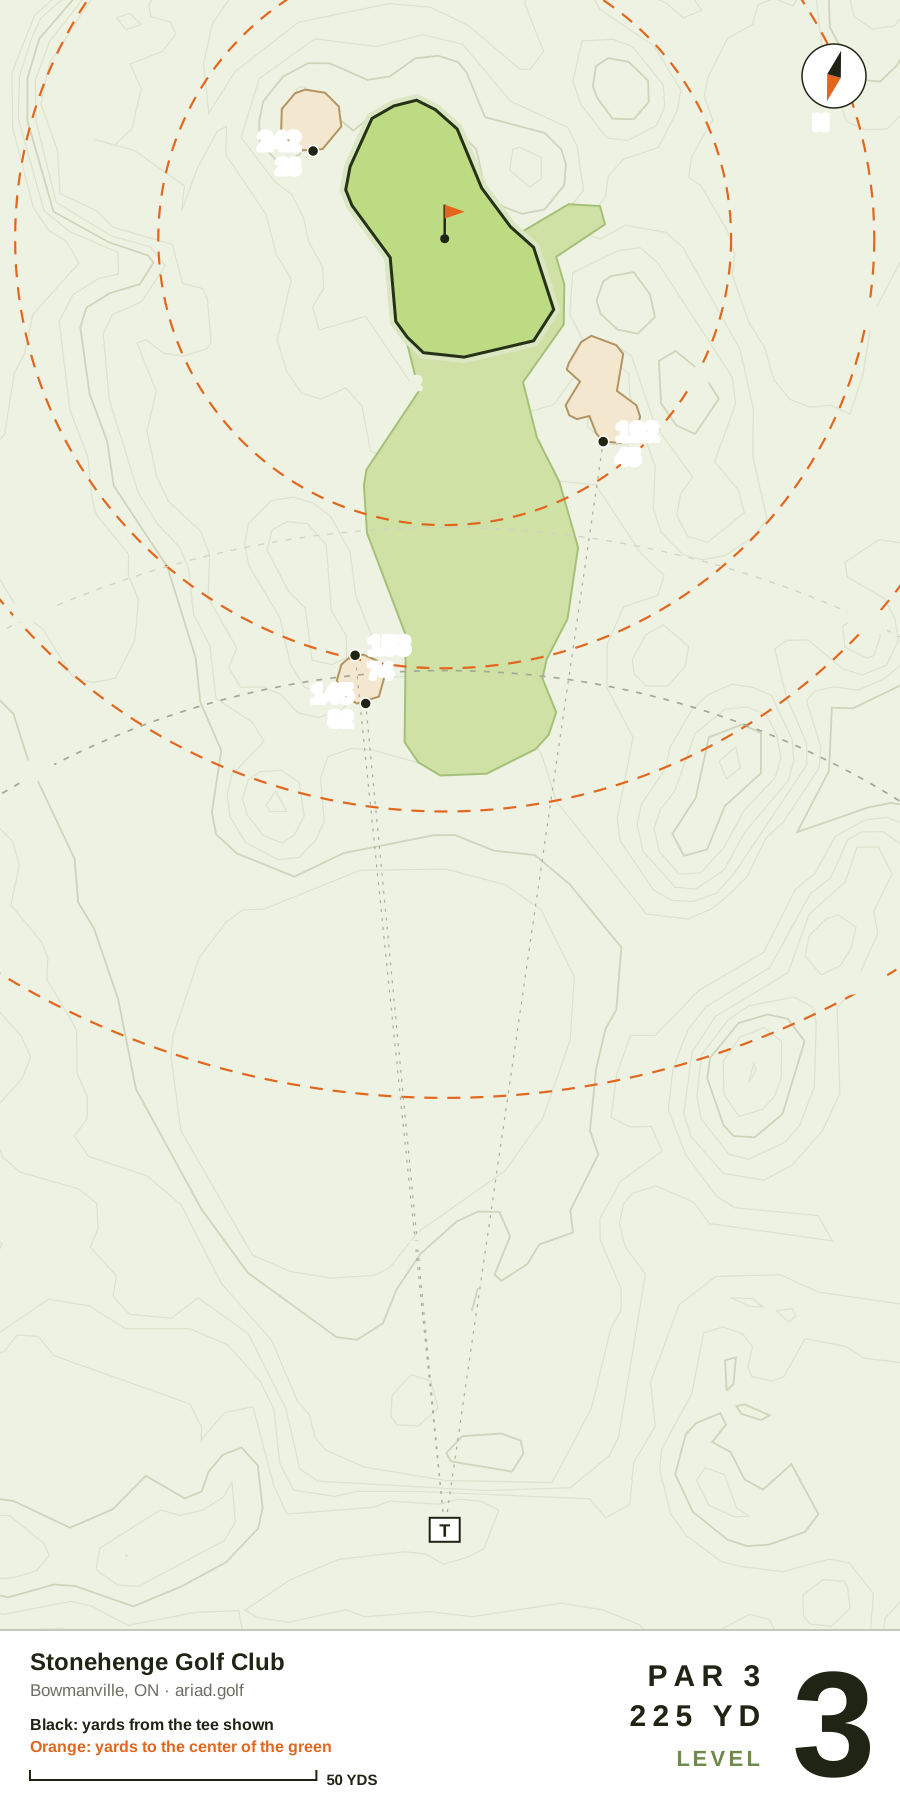





Par 5 · 574 yds (Plat) · Handicap 9
- Green
- 38 yds deep, 29 wide · 7,900 sq ft
- Shape
- Doglegs left at 429 from the tee (143 to the green)
- Bunkers
- Left: 330 to reach, 339 to carry (229 to the green); Left: 345 to reach, 356 to carry (215 to the green); Left: 361 to reach, 371 to carry (198 to the green). 1 bunker beside the green
Par 3 · 225 yds (Plat) · Handicap 7
- Green
- 45 yds deep, 37 wide · 8,900 sq ft
- Shape
- Straight
- Bunkers
- Left: 145 to reach, 153 to carry (78 to the green). 2 bunkers beside the green
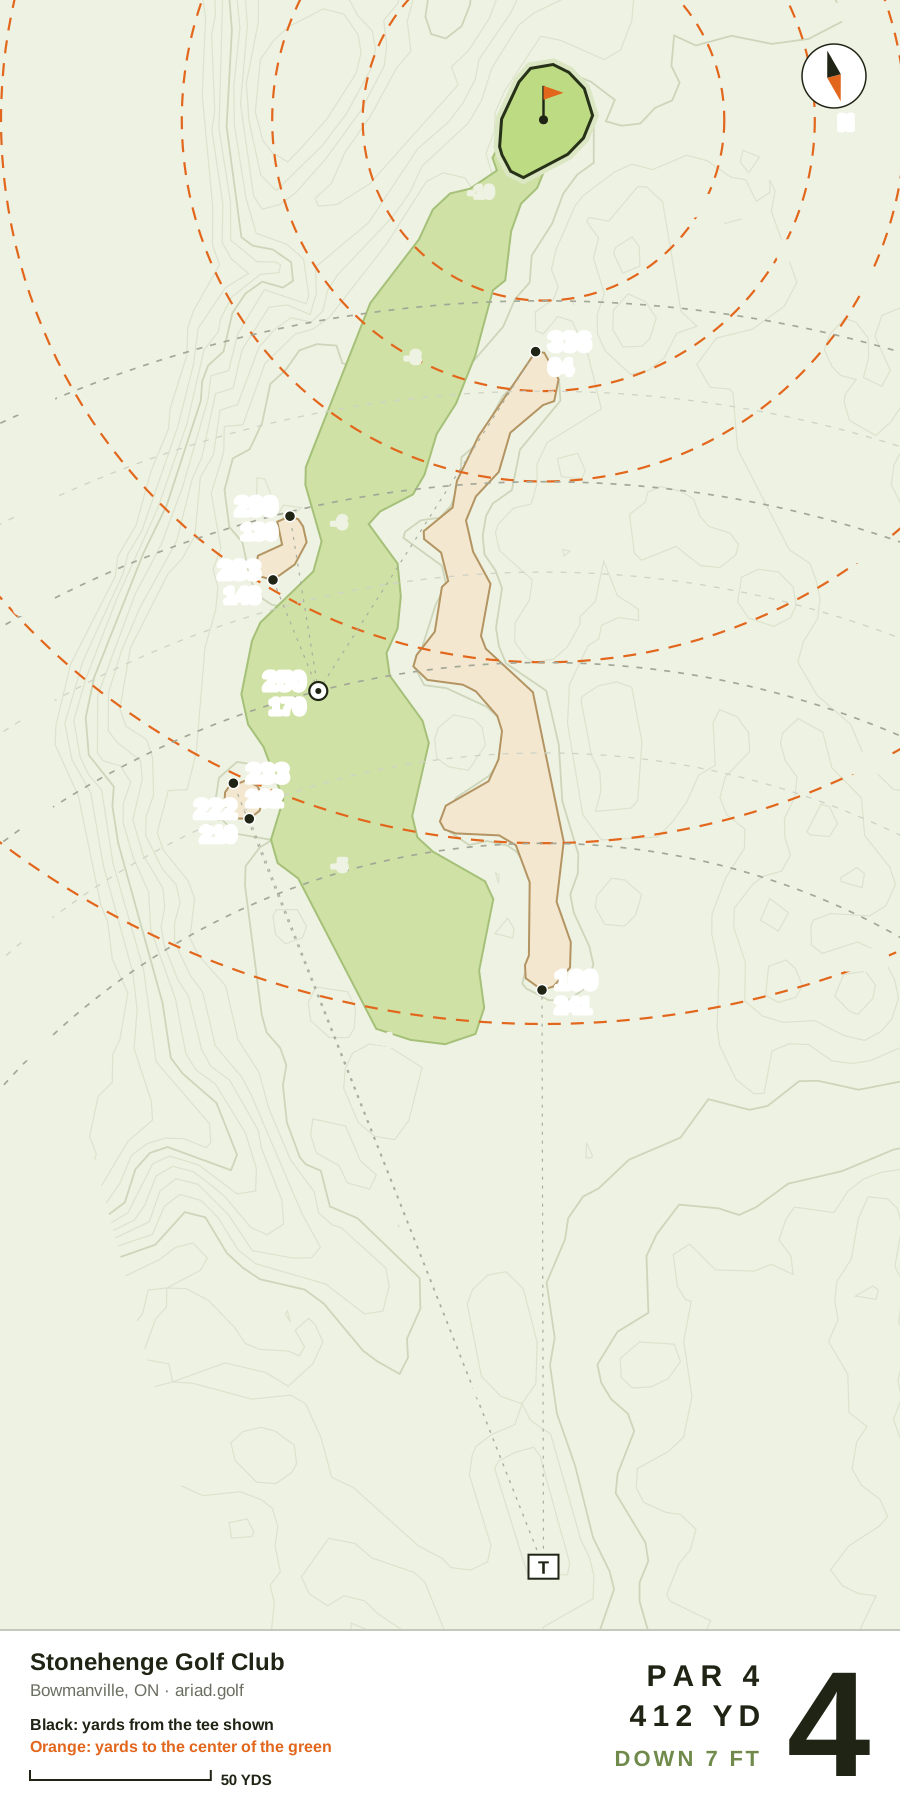
Par 4 · 412 yds (Plat) · Handicap 1
- Green
- 32 yds deep, 23 wide · 5,200 sq ft
- Shape
- Doglegs right at 262 from the tee (160 to the green)
- Bunkers
- Left: 222 to reach, 233 to carry (206 to the green); Right: 160 to reach, 336 to carry (156 to the green); Left: 283 to reach, 299 to carry (138 to the green)
Par 3 · 146 yds (Plat) · Handicap 15
- Green
- 32 yds deep, 33 wide · 7,100 sq ft
- Shape
- Straight
- Bunkers
- 1 bunker beside the green
Par 4 · 440 yds (Plat) · Handicap 11
- Green
- 34 yds deep, 29 wide · 7,000 sq ft
- Shape
- Doglegs left at 306 from the tee (142 to the green)
- Bunkers
- Right: 263 to reach, 273 to carry (197 to the green); Right: 301 to reach, 312 to carry (155 to the green); Right: 319 to reach, 330 to carry (131 to the green); Left: 291 to reach, 316 to carry (122 to the green); Left: 364 to reach, 374 to carry (58 to the green). 3 bunkers beside the green
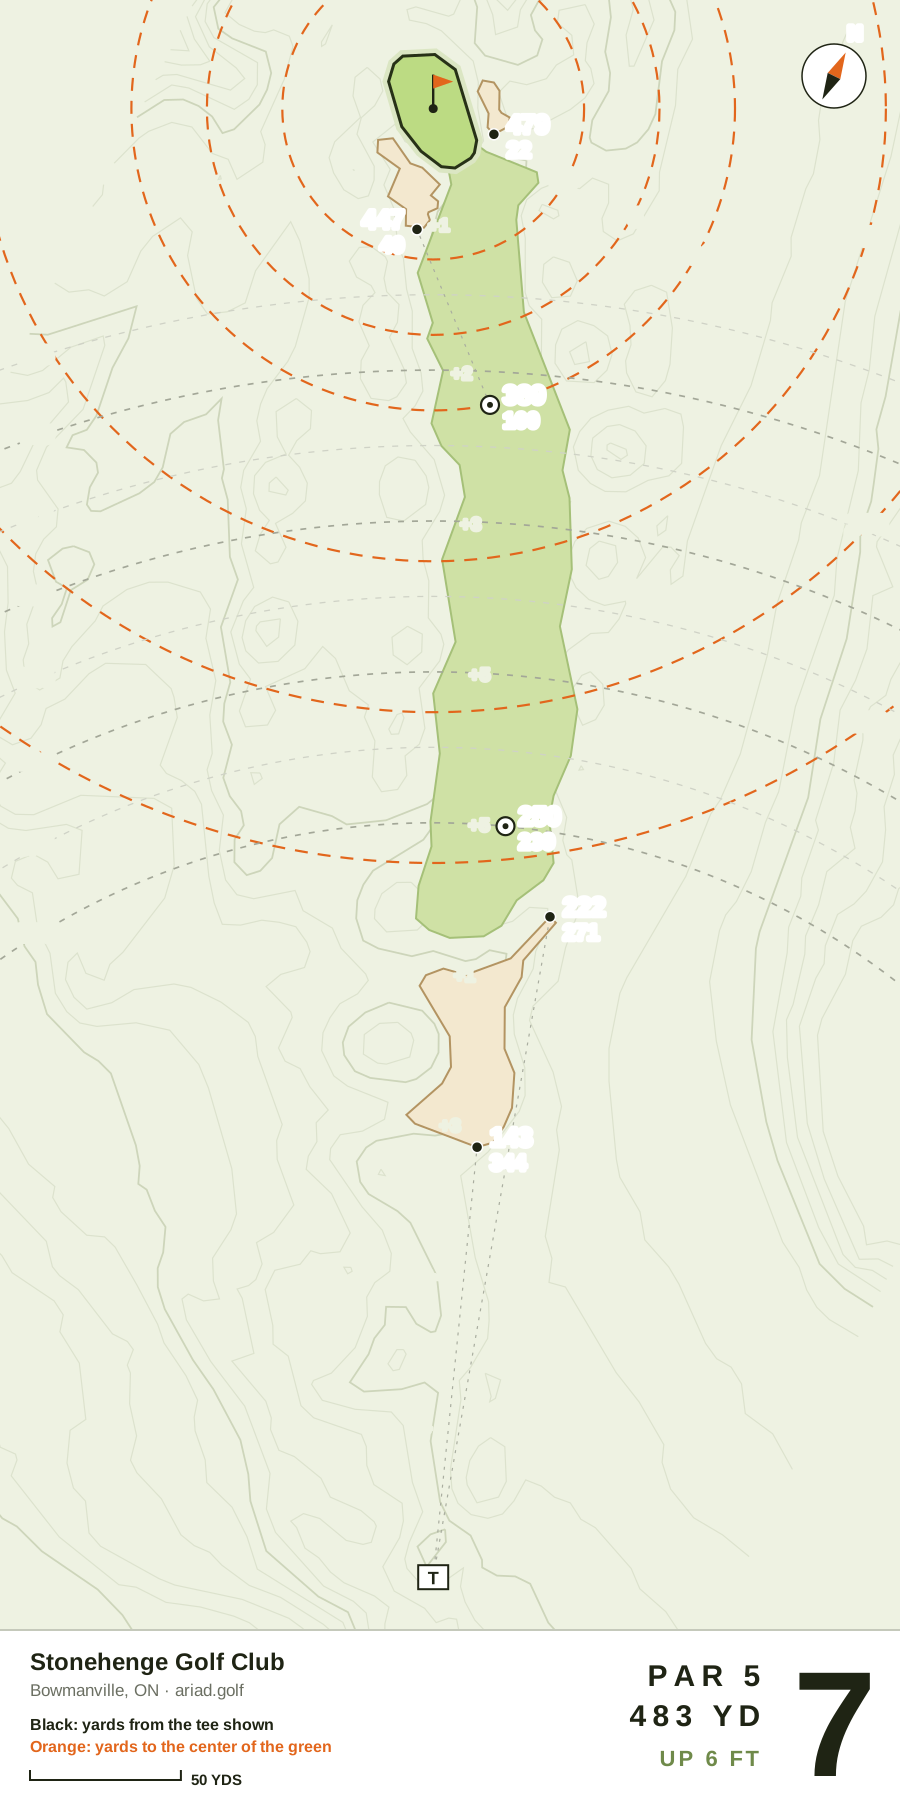
Par 5 · 483 yds (Plat) · Handicap 17
- Green
- 40 yds deep, 24 wide · 7,000 sq ft
- Shape
- Straight
- Bunkers
- Left: 143 to reach, 222 to carry (305 to the green). 2 bunkers beside the green
Par 3 · 185 yds (Plat) · Handicap 13
- Green
- 30 yds deep, 33 wide · 6,900 sq ft
- Shape
- Straight
- Bunkers
- Left: 104 to reach, 162 to carry (54 to the green). 1 bunker beside the green
Black numbers are yards from the tee shown, orange numbers yards to the center of the green. Measured from aerial imagery and elevation surveys, so treat them as approximate.
Stonehenge Golf Club scorecard
View the published hole-by-hole scorecard, with par, tee yardages and handicap indexes where available. Choose your tees to plan your round.
- Total yards
- 5,572
- Par
- 68
- Course rating
- 71.4
- Slope
- 129
Front nine
| Hole | 1 | 2 | 3 | 4 | 5 | 6 | 7 | 8 | 9 | Out |
|---|---|---|---|---|---|---|---|---|---|---|
| Par | 5 | 4 | 3 | 4 | 3 | 4 | 4 | 3 | 4 | 34 |
| Yards | 491 | 370 | 186 | 353 | 132 | 356 | 380 | 149 | 369 | 2,786 |
| Green | 456 | 286 | 149 | 282 | 99 | 287 | 303 | 104 | 343 | 2,309 |
| Plat | 574 | 437 | 225 | 412 | 146 | 440 | 483 | 185 | 401 | 3,303 |
| Gold | 533 | 388 | 197 | 394 | 136 | 376 | 432 | 167 | 383 | 3,006 |
| Handicap | 9 | 5 | 13 | 11 | 15 | 1 | 7 | 17 | 3 | — |
Back nine
| Hole | 10 | 11 | 12 | 13 | 14 | 15 | 16 | 17 | 18 | In | Total |
|---|---|---|---|---|---|---|---|---|---|---|---|
| Par | 5 | 4 | 3 | 4 | 3 | 4 | 4 | 3 | 4 | 34 | 68 |
| Yards | 491 | 370 | 186 | 353 | 132 | 356 | 380 | 149 | 369 | 2,786 | 5,572 |
| Green | 456 | 286 | 149 | 282 | 99 | 287 | 303 | 104 | 343 | 2,309 | 4,618 |
| Plat | 574 | 437 | 225 | 412 | 146 | 440 | 483 | 185 | 401 | 3,303 | 6,606 |
| Gold | 533 | 388 | 197 | 394 | 136 | 376 | 432 | 167 | 383 | 3,006 | 6,012 |
| Handicap | 10 | 6 | 14 | 12 | 16 | 2 | 8 | 18 | 4 | — | — |
All distances in yards. Par and handicap reflect Red Women. A dash means we don’t have that value yet.
 Save or print this scorecardOpen full-size image · All tees
Stonehenge Golf Club hole by hole
Explore Stonehenge Golf Club hole by hole on the 3D map, covering 7 mapped holes. Choose a mapped hole for a 3D fly-through and preview its layout before your round.
About Stonehenge Golf Club
Stonehenge Golf Club is a 18-hole, par-70 golf course in Bowmanville, ON. The free Stonehenge Golf Club yardage book shows hole layouts for 7 of 18 holes, with carries from the tee and distances to the center of each green. Stonehenge Golf Club green maps show the mapped putting surfaces for 7 of 18 holes, with green dimensions where available. The 7 mapped greens average 7,100 sq ft, from 5,200 on the fourth to 8,900 on the third. The layout has 6 par 3s, 8 par 4s, and 4 par 5s. The number-one handicap hole is the 412-yard par-4 fourth. The longest hole is the 574-yard par-5 first.