
Royal Melbourne
View the scorecard and hole-by-hole yardages. Explore the interactive course map. Download a free printable course map PDF and a free printable yardage book PDF. No signup required.
Royal Melbourne course layout, yardage book, scorecard, green maps
Interactive course map
Click a hole to see its details below the map
Explore the mapped course layout at Royal Melbourne, with all 18 holes shown. Select a mapped hole to explore its layout and available details.
Download course map PDFFree printable PDF · No signup required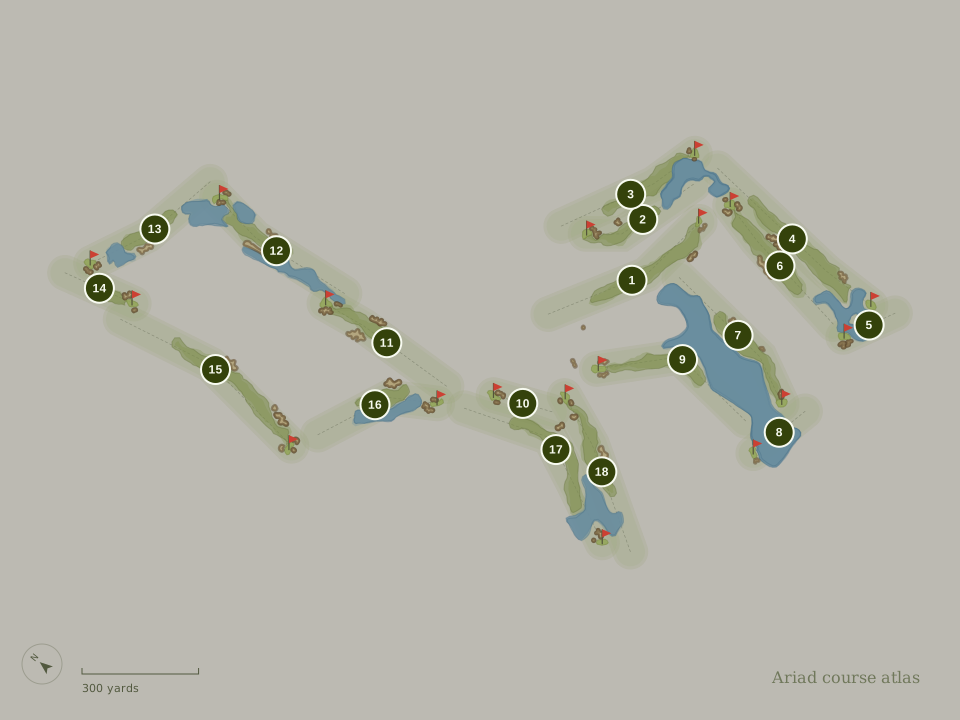
Hole 1Par 5
- Shark
- 476 yd
- Burgundy
- 421 yd
- Royal
- 465 yd
- Silver
- 446 yd
- Aussie
- 465 yd
- Silver
- 446 yd
- Ozzie
- 446 yd
- Combo
- 476 yd
- Burgundy
- 421 yd
- Royal
- 465 yd
- Combo
- 476 yd
- Shark
- 476 yd
- Ozzie
- 446 yd
Yardage book & Green maps
Free · 18 holes · Download printable yardage book PDF
Explore 18 mapped hole layouts with tee-to-green distances in the free yardage book. View 18 green maps showing putting surface outlines and dimensions where available. No signup required.
Par 5 · 476 yds (Shark) · Handicap 9
- Green
- 24 yds deep, 21 wide · 2,800 sq ft
- Shape
- Doglegs left at 274 from the tee (191 to the green)
- Bunkers
- 1 bunker beside the green
Par 4 · 329 yds (Shark) · Handicap 11
- Green
- 26 yds deep, 26 wide · 4,000 sq ft
- Shape
- Doglegs right at 225 from the tee (91 to the green)
- Bunkers
- Right: 211 to reach, 226 to carry (86 to the green). 1 bunker beside the green
- Water
- Along the right, 271–188 yds from the green
Par 4 · 395 yds (Shark) · Handicap 5
- Green
- 27 yds deep, 26 wide · 4,000 sq ft
- Shape
- Straight
- Bunkers
- 2 bunkers beside the green
- Water
- Right of the green; Along the right, 101–25 yds from the green
Par 5 · 534 yds (Shark) · Handicap 1
- Green
- 33 yds deep, 21 wide · 4,600 sq ft
- Shape
- Straight
- Bunkers
- Right: 101 to reach, 123 to carry (426 to the green); Right: 215 to reach, 246 to carry (305 to the green); Right: 243 to reach, 267 to carry (282 to the green); Left: 411 to reach, 441 to carry (101 to the green)
- Water
- Right of the green; Crosses the hole: 472 to reach, 502 to carry from the tee; Along the right, 496–460 yds from the green
Par 3 · 147 yds (Shark) · Handicap 17
- Green
- 30 yds deep, 24 wide · 4,500 sq ft
- Shape
- Straight
- Bunkers
- 2 bunkers beside the green
- Water
- In front of the green; Crosses the hole: 56 to reach, 125 to carry from the tee
Par 4 · 407 yds (Shark) · Handicap 15
- Green
- 28 yds deep, 29 wide · 4,600 sq ft
- Shape
- Straight
- Bunkers
- Left: 197 to reach, 260 to carry (181 to the green); Right: 233 to reach, 257 to carry (164 to the green); Right: 255 to reach, 285 to carry (139 to the green). 1 bunker beside the green
- Water
- Along the right, 359–304 yds from the green
Par 4 · 416 yds (Shark) · Handicap 3
- Green
- 23 yds deep, 30 wide · 4,400 sq ft
- Shape
- Doglegs right at 291 from the tee (132 to the green)
- Bunkers
- Left: 169 to reach, 195 to carry (242 to the green); Left: 204 to reach, 229 to carry (209 to the green); Left: 274 to reach, 289 to carry (147 to the green). 1 bunker beside the green
- Water
- Right of the green; Along the right, 385–39 yds from the green
Par 3 · 176 yds (Shark) · Handicap 13
- Green
- 22 yds deep, 28 wide · 3,700 sq ft
- Shape
- Straight
- Bunkers
- 1 bunker beside the green
- Water
- In front of the green; Crosses the hole: 62 to reach, 154 to carry from the tee
Par 4 · 443 yds (Shark) · Handicap 7
- Green
- 37 yds deep, 22 wide · 5,500 sq ft
- Shape
- Doglegs left at 237 from the tee (212 to the green)
- Bunkers
- 2 bunkers beside the green
- Water
- Along the right, 373–260 yds from the green
Par 3 · 162 yds (Shark) · Handicap 18
- Green
- 39 yds deep, 26 wide · 4,600 sq ft
- Shape
- Straight
- Bunkers
- 2 bunkers beside the green
Par 4 · 380 yds (Shark) · Handicap 10
- Green
- 31 yds deep, 27 wide · 4,800 sq ft
- Shape
- Straight
- Bunkers
- Right: 223 to reach, 264 to carry (143 to the green); Left: 242 to reach, 292 to carry (114 to the green). 2 bunkers beside the green
- Water
- Right of the green; Along the right, 40–24 yds from the green
Par 4 · 415 yds (Shark) · Handicap 4
- Green
- 31 yds deep, 36 wide · 4,700 sq ft
- Shape
- Straight
- Bunkers
- Right: 207 to reach, 257 to carry (172 to the green); Left: 218 to reach, 290 to carry (158 to the green). 2 bunkers beside the green
- Water
- Crosses the hole: 85 to reach, 121 to carry from the tee; Along the right, 113–25 yds from the green; In front of the green; Along the left, 64–25 yds from the green
Par 4 · 379 yds (Shark) · Handicap 14
- Green
- 31 yds deep, 29 wide · 4,600 sq ft
- Shape
- Straight
- Bunkers
- Left: 220 to reach, 258 to carry (148 to the green). 2 bunkers beside the green
- Water
- Along the left, 332–254 yds from the green; Crosses the hole: 284 to reach, 323 to carry from the tee
Par 3 · 191 yds (Shark) · Handicap 16
- Green
- 34 yds deep, 18 wide · 3,800 sq ft
- Shape
- Straight
- Bunkers
- Left: 50 to reach, 71 to carry (141 to the green). 2 bunkers beside the green
Par 5 · 564 yds (Shark) · Handicap 8
- Green
- 26 yds deep, 32 wide · 4,100 sq ft
- Shape
- Doglegs right at 259 from the tee (296 to the green)
- Bunkers
- Left: 280 to reach, 327 to carry (268 to the green); Left: 452 to reach, 465 to carry (110 to the green); Left: 466 to reach, 509 to carry (77 to the green). 3 bunkers beside the green
Par 4 · 342 yds (Shark) · Handicap 12
- Green
- 33 yds deep, 24 wide · 3,400 sq ft
- Shape
- Doglegs right at 206 from the tee (125 to the green)
- Bunkers
- Left: 215 to reach, 254 to carry (126 to the green). 2 bunkers beside the green
- Water
- Crosses the hole: 108 to reach, 128 to carry from the tee; Crosses the hole: 246 to reach, 278 to carry from the tee
Par 5 · 543 yds (Shark) · Handicap 2
- Green
- 21 yds deep, 30 wide · 3,300 sq ft
- Shape
- Doglegs right at 233 from the tee (301 to the green)
- Bunkers
- Left: 241 to reach, 261 to carry (317 to the green); Right: 230 to reach, 272 to carry (272 to the green). 2 bunkers beside the green
- Water
- Crosses the hole: 405 to reach, 444 to carry from the tee
Par 4 · 432 yds (Shark) · Handicap 6
- Green
- 35 yds deep, 22 wide · 4,200 sq ft
- Shape
- Straight
- Bunkers
- Right: 234 to reach, 283 to carry (179 to the green); Left: 369 to reach, 383 to carry (54 to the green). 2 bunkers beside the green
- Water
- Crosses the hole: 72 to reach, 105 to carry from the tee
Black numbers are yards from the tee shown, orange numbers yards to the center of the green. Measured from aerial imagery and elevation surveys, so treat them as approximate.
Royal Melbourne scorecard
View the published hole-by-hole scorecard, with par, tee yardages and handicap indexes where available. Choose your tees to plan your round.
- Total yards
- 6,731
- Par
- 72
- Course rating
- 74.1
- Slope
- 145
Front nine
| Hole | 1 | 2 | 3 | 4 | 5 | 6 | 7 | 8 | 9 | Out |
|---|---|---|---|---|---|---|---|---|---|---|
| Par | 5 | 4 | 4 | 5 | 3 | 4 | 4 | 3 | 4 | 36 |
| Yards | 476 | 329 | 395 | 534 | 147 | 407 | 416 | 176 | 443 | 3,323 |
| Burgundy | 421 | 259 | 301 | 434 | 104 | 331 | 305 | 80 | 332 | 2,567 |
| Royal | 465 | 313 | 360 | 505 | 130 | 380 | 390 | 145 | 414 | 3,102 |
| Silver | 446 | 305 | 333 | 480 | 118 | 357 | 376 | 130 | 373 | 2,918 |
| Aussie | 465 | 313 | 333 | 480 | 130 | 380 | 376 | 145 | 373 | 2,995 |
| Ozzie | 446 | 305 | 301 | 434 | 118 | 331 | 305 | 130 | 332 | 2,702 |
| Combo | 476 | 329 | 360 | 534 | 147 | 407 | 390 | 145 | 414 | 3,202 |
| Handicap | 9 | 11 | 5 | 1 | 17 | 15 | 3 | 13 | 7 | — |
Back nine
| Hole | 10 | 11 | 12 | 13 | 14 | 15 | 16 | 17 | 18 | In | Total |
|---|---|---|---|---|---|---|---|---|---|---|---|
| Par | 3 | 4 | 4 | 4 | 3 | 5 | 4 | 5 | 4 | 36 | 72 |
| Yards | 162 | 380 | 415 | 379 | 191 | 564 | 342 | 543 | 432 | 3,408 | 6,731 |
| Burgundy | 98 | 315 | 255 | 317 | 127 | 450 | 266 | 454 | 304 | 2,586 | 5,153 |
| Royal | 140 | 365 | 368 | 359 | 162 | 520 | 314 | 509 | 399 | 3,136 | 6,238 |
| Silver | 117 | 343 | 336 | 340 | 150 | 468 | 297 | 480 | 389 | 2,920 | 5,838 |
| Aussie | 140 | 365 | 336 | 359 | 162 | 468 | 314 | 480 | 389 | 3,013 | 6,008 |
| Ozzie | 117 | 343 | 255 | 317 | 150 | 468 | 297 | 454 | 304 | 2,705 | 5,407 |
| Combo | 162 | 380 | 368 | 379 | 162 | 564 | 342 | 509 | 399 | 3,265 | 6,467 |
| Handicap | 18 | 10 | 4 | 14 | 16 | 8 | 12 | 2 | 6 | — | — |
All distances in yards. Par and handicap reflect Shark. A dash means we don’t have that value yet.
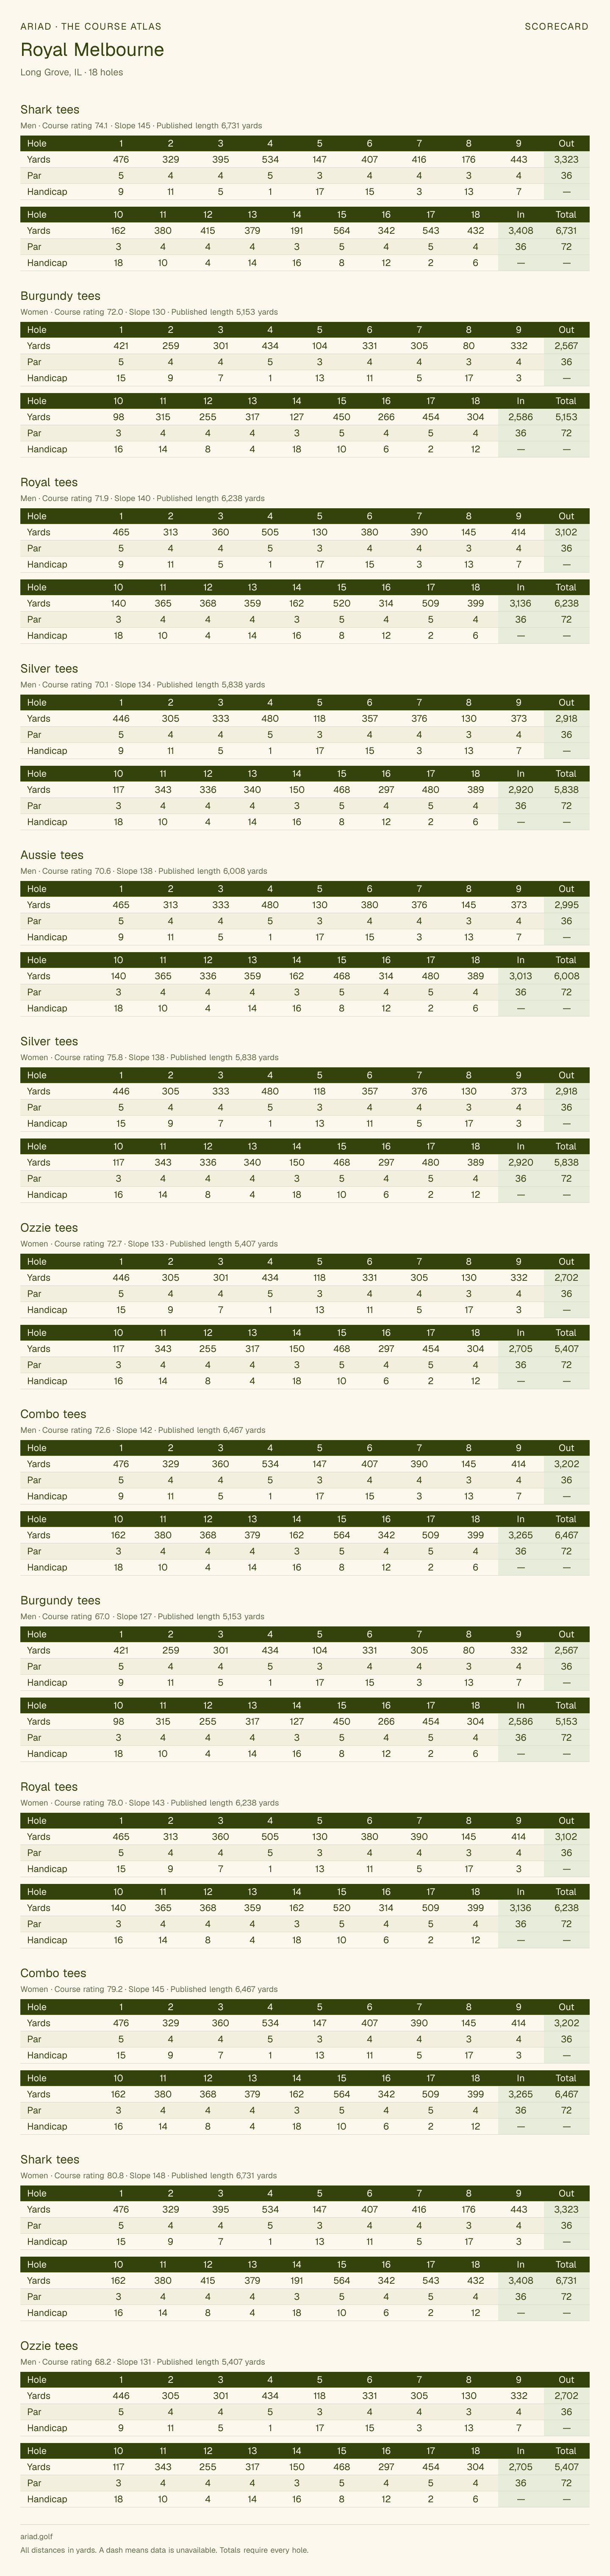 Save or print this scorecardOpen full-size image · All tees
Royal Melbourne 3D map
About Royal Melbourne
Royal Melbourne is a 18-hole, par-72 golf course in Long Grove, IL. The free Royal Melbourne yardage book shows all 18 hole layouts, with carries from the tee and distances to the center of each green. Royal Melbourne green maps show the mapped putting surfaces for all 18 holes, with green dimensions where available. The greens average 4,200 sq ft, from 2,800 on the first to 5,500 on the ninth. Water comes into play on 14 holes and 55 bunkers are mapped along the fairways and around the greens. The layout has 4 par 3s, 10 par 4s, and 4 par 5s. The number-one handicap hole is the 534-yard par-5 fourth. The longest hole is the 564-yard par-5 fifteenth.
Course information
- Facility
- Royal Melbourne
- Location
- Long Grove, ILGet directions
Courses at Royal Melbourne
Choose a layout for its scorecard, tee yardages and available course map.
Questions about Royal Melbourne
Plan your round, from the first tee to the last green.
How many holes and what par is Royal Melbourne?
Royal Melbourne is listed as a 18-hole course. The published scorecard totals par 72 for the Shark tees.
How long is Royal Melbourne?
Published tee lengths at Royal Melbourne range from 5,153 yards (Burgundy) to 6,731 yards (Shark). Compare tee yardages.
What are the published golf ratings at Royal Melbourne?
The Shark tees at Royal Melbourne list a course rating of 74.1 and a slope rating of 145 for men. See the ratings by tee.
Can I download a Royal Melbourne course map PDF?
Yes. Download the free Royal Melbourne course map PDF in Ariad’s watercolor illustration style, with numbered mapped holes, a north arrow and a yardage scale. The map preview shows the available hole coverage.
Where can I find the Royal Melbourne scorecard?
The Royal Melbourne scorecard shows the published hole-by-hole details, with par, tee yardages and handicap indexes where available. You can save or print the scorecard image.
Is there a free Royal Melbourne yardage map PDF?
Yes. Download the Royal Melbourne yardage map PDF as a free printable yardage book. Preview the yardage maps for all 18 hole layouts, with carries from the tee and distances to the center of the green.
Are green maps available for Royal Melbourne?
Yes. The Royal Melbourne green maps show mapped putting surface outlines for all 18 holes, with dimensions where available. Slope arrows and heatmaps appear where a green has usable elevation survey data.
Is Royal Melbourne walkable?
Measured on our map, the walk from the first tee to the last green is about 4.6 miles, 0.8 of them from greens to the next tees. The longest walk between holes is about 228 yards, from the sixth green to the seventh tee.
Take it to
the first tee.
Ariad is golf GPS, shot tracking and 3D round replays for iPhone and Apple Watch, on the same course maps as this page.
Join the waitlist for launch updates. Screens from Ariad on iPhone and Apple Watch.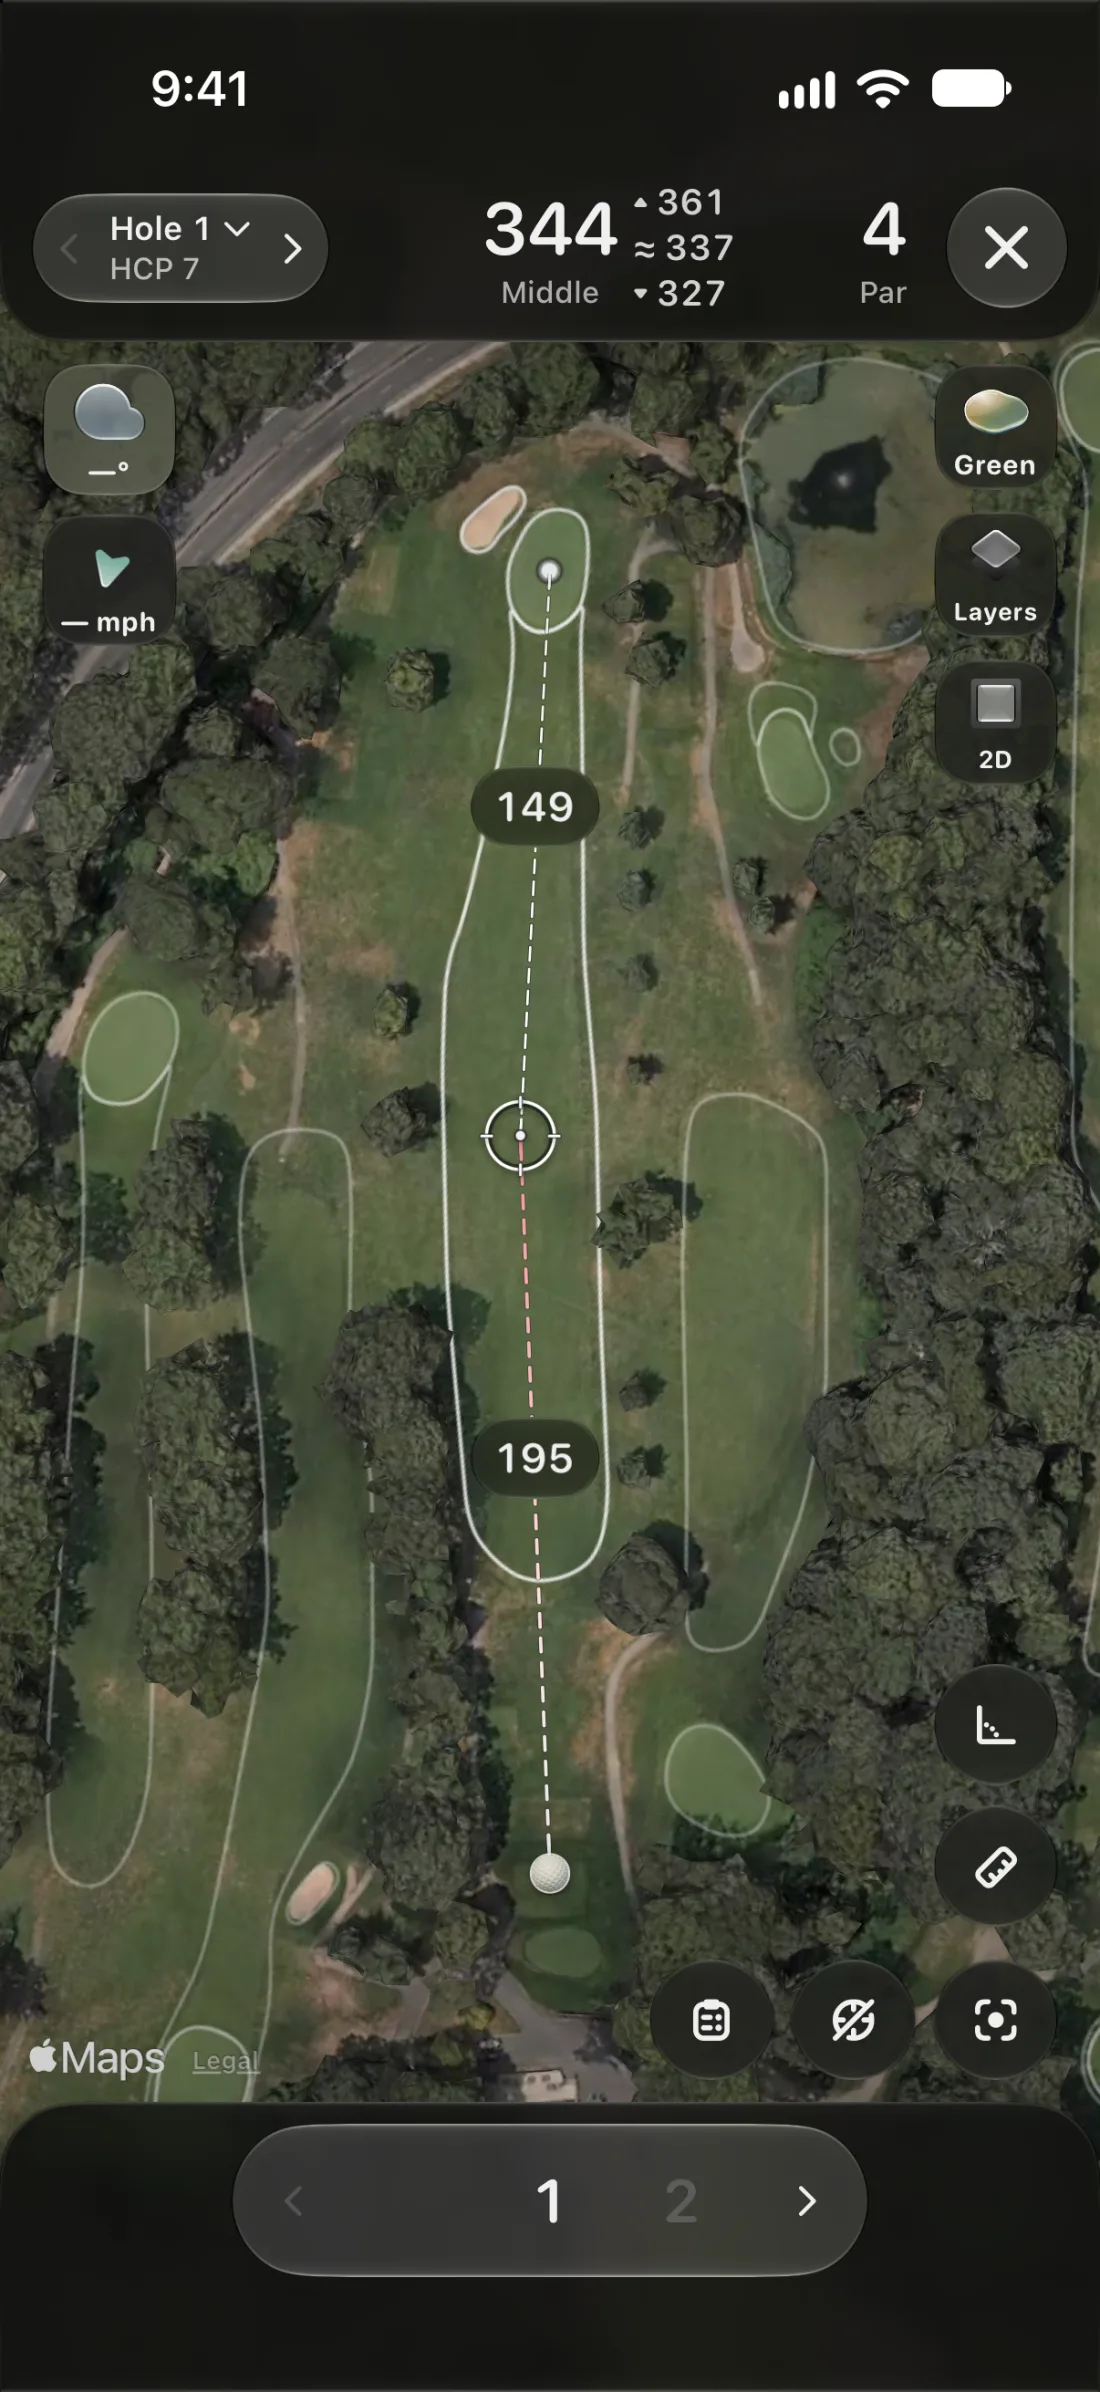 GPS
Every yardage, live.
Front, middle and back of the green, and the distance to any spot you tap, on a satellite map of the hole you’re playing.
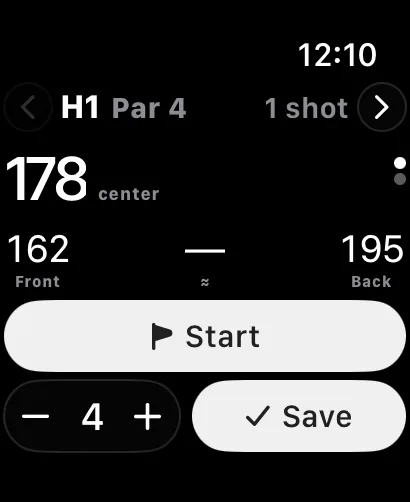 SHOT TRACKING
Mark it and walk on.
Tap where the ball finished and Ariad measures the shot. On Apple Watch it notices your swings, so the round keeps itself.
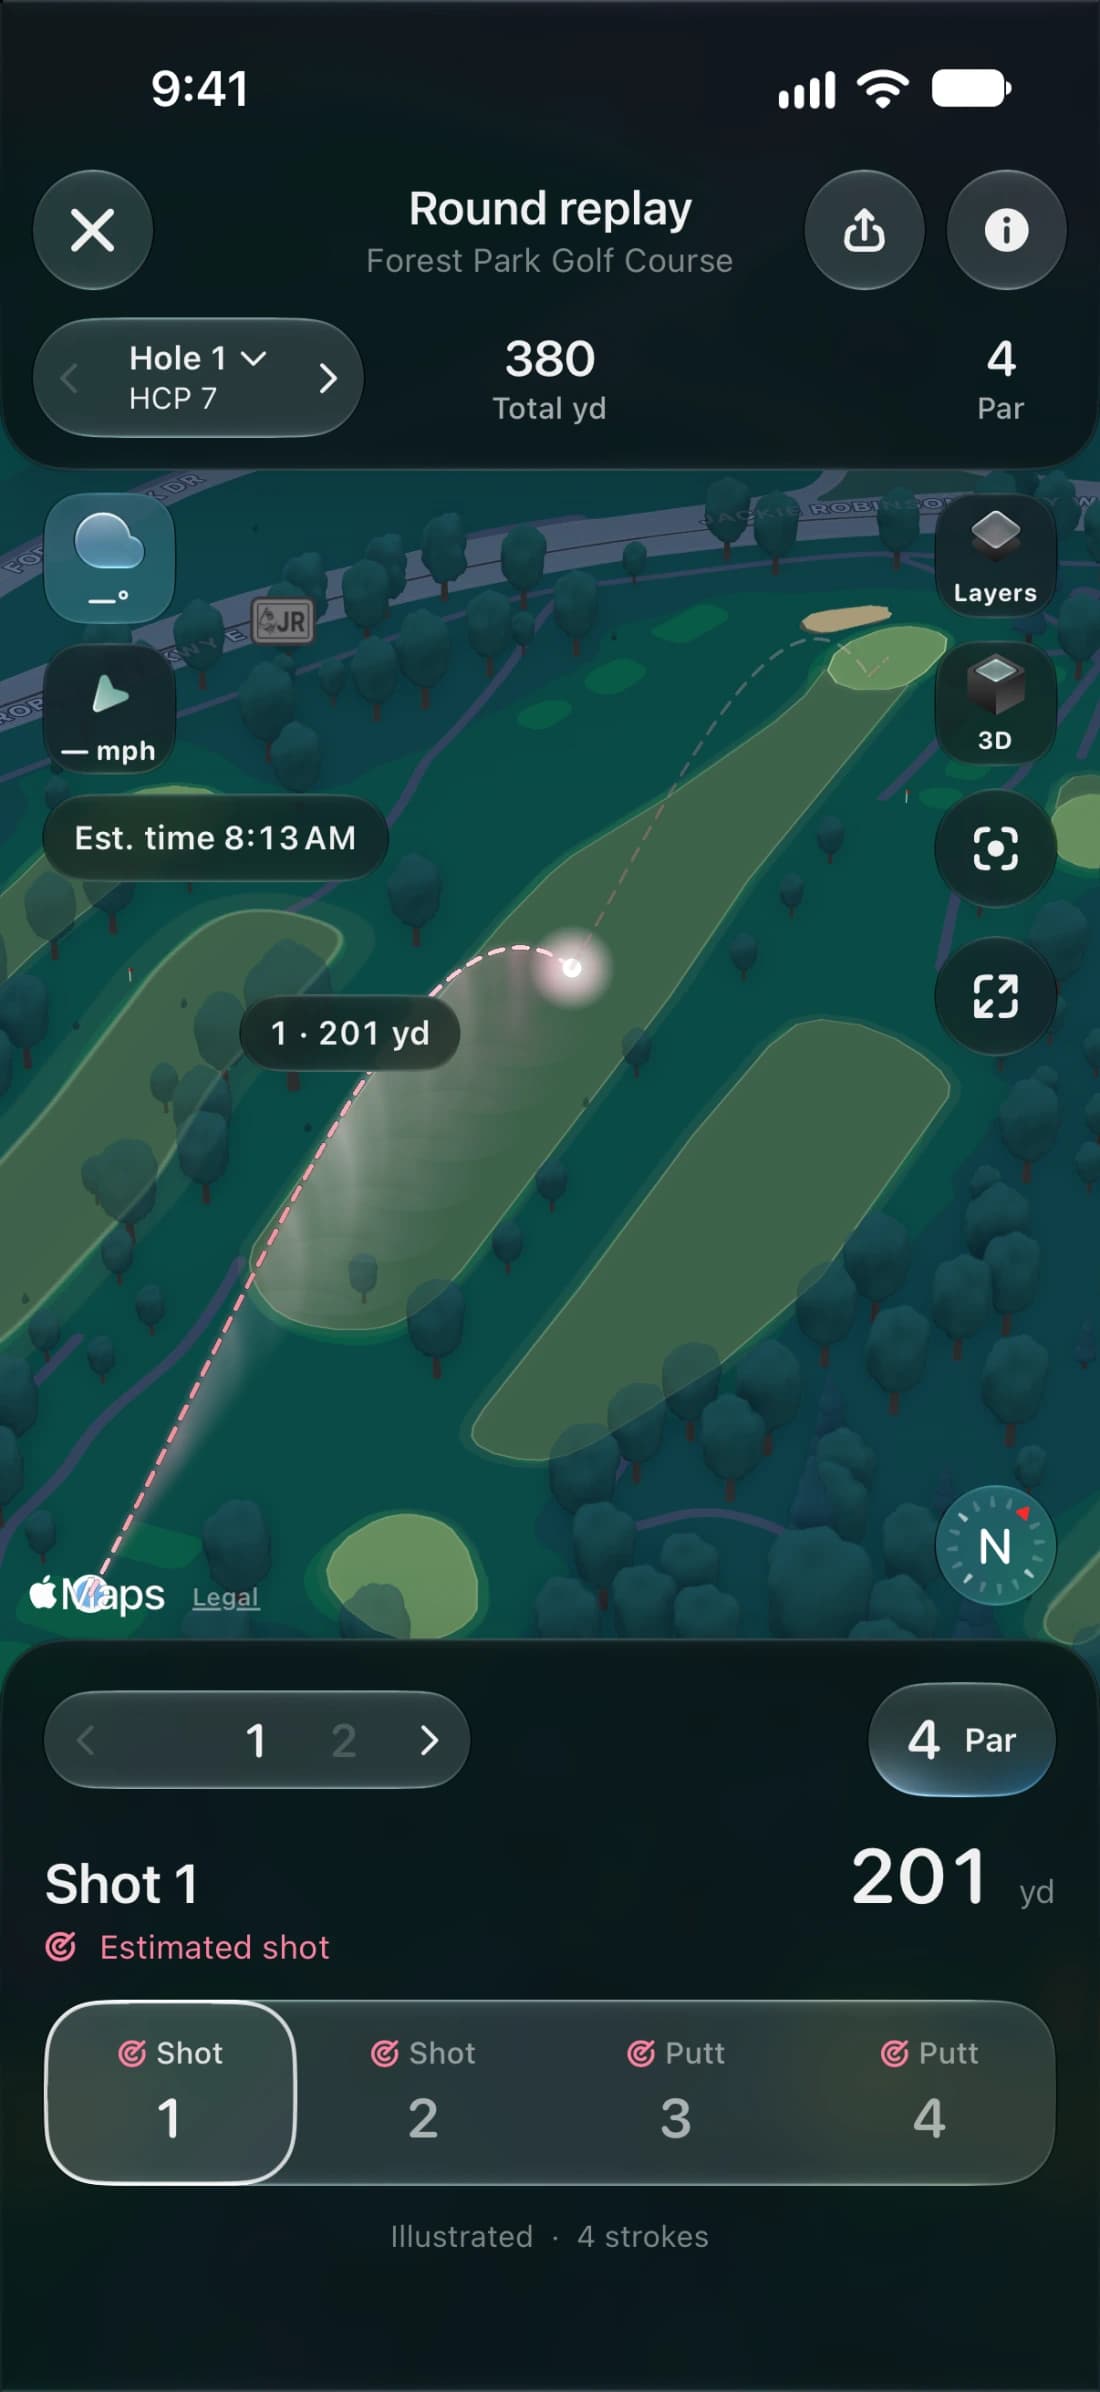 3D REPLAYS
Fly the round back.
After the last putt, every hole comes back in 3D on real terrain, with each shot’s arc from the tee to the cup.
Twin Orchard Country Club - White Course
Course detailsTwin Orchard Country Club
Course details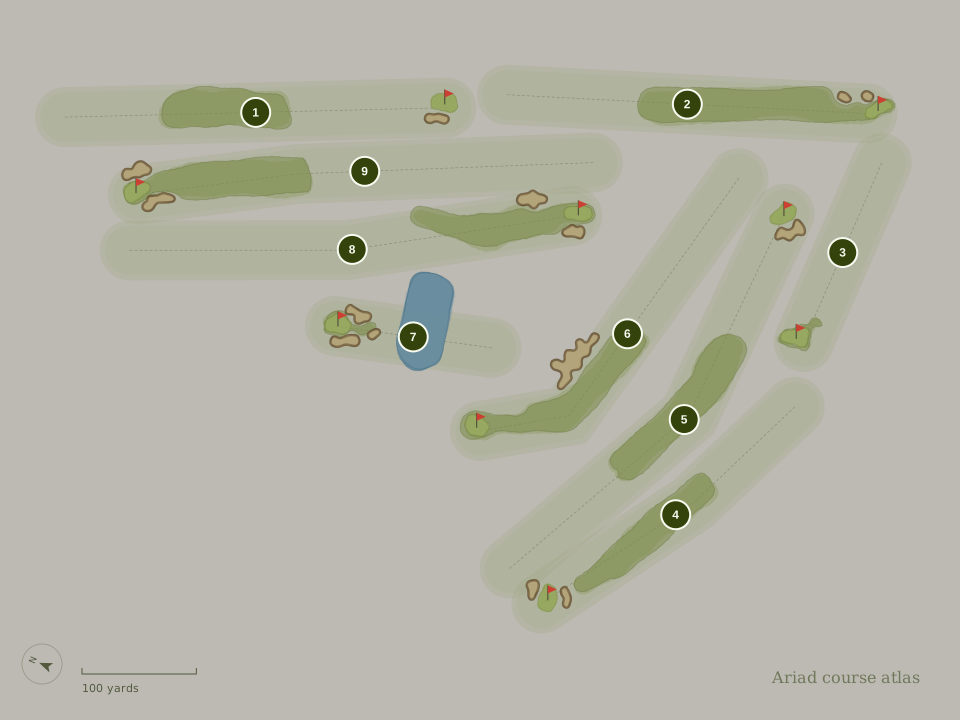 9 holes
Vernon Hills Golf Course
Scorecard & map 18 holes
Kemper Lakes Golf Club
Scorecard & map 18 holes
The Arboretum Club
Scorecard & map 18 holes
The Grove Country Club
Scorecard & map 18 holes
Buffalo Grove Golf Club
Scorecard & map 18 holes
White Deer Run Golf Club
Scorecard & map 18 holes